windows 安装 open3d
Open3D:Win10 + VS2017配置Open3D(C++、python)_累了就要打游戏-CSDN博客_open3d
下载源码
git clone https://codechina.csdn.net/mirrors/intel-isl/Open3D.git更新子模块
git checkout v0.10.0找到仓库目录下的.gitmodules文件,修改子模块链接为国内链接,因为国内的仓库不会实时更新,所以有的错误可能就是链接对应的仓库版本发生了改变,这时就需要自己手动在找一个新的仓库。
[submodule "3rdparty/pybind11"]
	path = 3rdparty/pybind11
	url = https://gitee.com/zzwmirrors/pybind11.git
[submodule "3rdparty/eigen-git-mirror"]
	path = 3rdparty/Eigen
	url = https://gitee.com/sabertot/eigen-git-mirror.git
[submodule "3rdparty/qhull"]
	path = 3rdparty/qhull
	url = https://gitee.com/QQ975150313/qhull.git
	branch = master
[submodule "3rdparty/googletest"]
	path = 3rdparty/googletest
	url = https://gitee.com/longing/googletest.git
	branch = master
[submodule "3rdparty/tinyobjloader"]
	path = 3rdparty/tinyobjloader/tinyobjloader
	url = https://gitee.com/infinityyf/tinyobjloader.git
	branch = master
[submodule "3rdparty/open3d_sphinx_theme"]
	path = 3rdparty/open3d_sphinx_theme
	url = https://gitee.com/jiuyueshiwoa/open3d_sphinx_theme.git
[submodule "3rdparty/fmt"]
	path = 3rdparty/fmt
	url = https://gitee.com/createrjd/fmt.git
[submodule "3rdparty/tinygltf"]
	path = 3rdparty/tinygltf/tinygltf
	url = https://gitee.com/jiuyueshiwoa/tinygltf.git
[submodule "3rdparty/libjpeg-turbo/libjpeg-turbo"]
	path = 3rdparty/libjpeg-turbo/libjpeg-turbo
	url = https://gitee.com/yugu/libjpeg-turbo.git
[submodule "3rdparty/PoissonRecon/Open3D-PoissonRecon"]
	path = 3rdparty/PoissonRecon/PoissonRecon
	url = https://gitee.com/jiuyueshiwoa/Open3D-PoissonRecon.git
[submodule "3rdparty/cutlass"]
	path = 3rdparty/cutlass
	url = https://gitee.com/luckydog1995/cutlass
[submodule "3rdparty/filament/filament"]
	path = 3rdparty/filament/filament
	url = https://gitee.com/zymITsky/filament.git
[submodule "3rdparty/imgui"]
	path = 3rdparty/imgui
	url = https://gitee.com/ant1423/imgui.git
[submodule "3rdparty/benchmark"]
	path = 3rdparty/benchmark
url = https://gitee.com/EwenWan/benchmark.git使用git submodule更新子模块
git submodule init
git submodule update
CMAKE编译
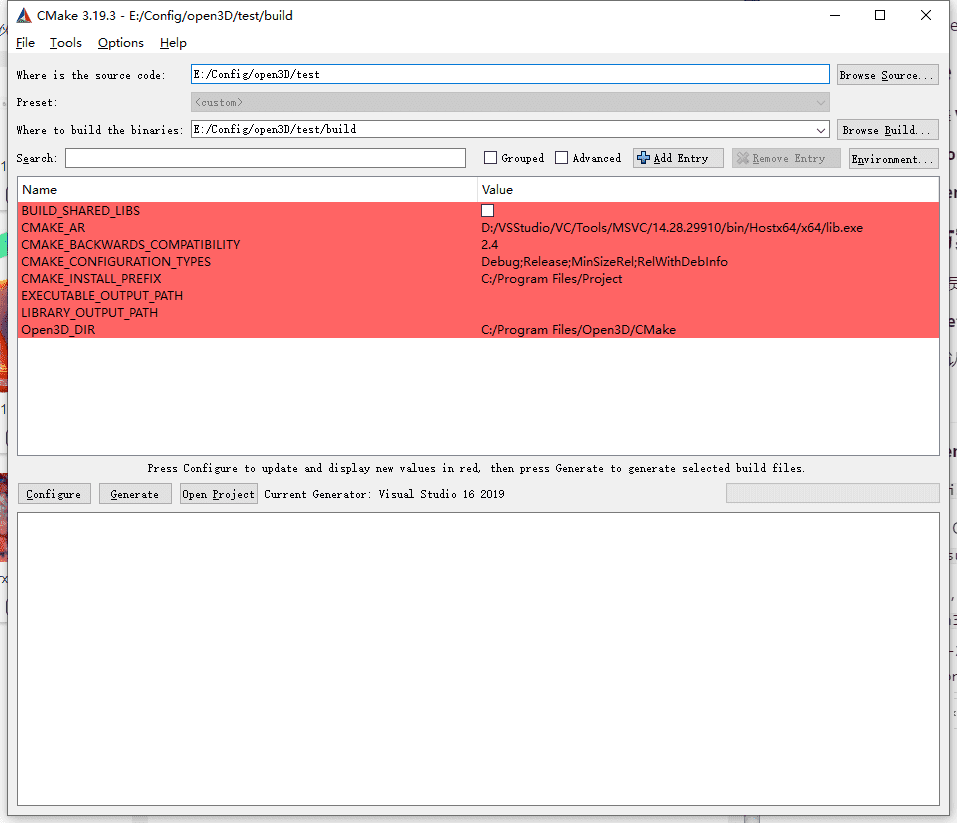
设置路径
- source code: E:/Config/open3D/Open3D
- build binaries: E:/Config/open3D/bulid
Configure
generator 选择 Visual Studio 16 2019, optional platform for generator 选择x64
Configure -> Configure done
Generate -> Generating done
生成解决方案
用 VS2019 管理员权限打开 E:/Config/open3D/build/Open3D.sln Release-x64
将CMakePredefinedTargets/ALL_BUILD 设为启动项,右击生成
打包
右击 CMakePredefinedTargets/INSTALL,仅用于项目 -> 仅生成INSTALL;
因为设置的时默认安装路径,所以open3d的库都在C:/Program Files/Open3D下。
测试
在{git_dir}\Open3D\docs_static\C++ 目录下有测试文件TestVisualizer.cpp和CMakeLists.txt
拷贝
TestVisualizer.cpp和CMakeLists.txt文件到路径C:/testVisualizer下;打开CMake GUI并设置source目录为
C:/testVisualizer,binaries 目录设置为C:/testVisualizer/build;
configure,配置完毕以后,将Open3D_DIR设置成Open3D的安装,比如我的是C:/Program Files/Open3DGenerate,生成完毕以后,使用VS2019管理员权限 打开TestVisualizer.sln,生成解决方案后执行,得到testVisualizer.exe在build\Release- 下载
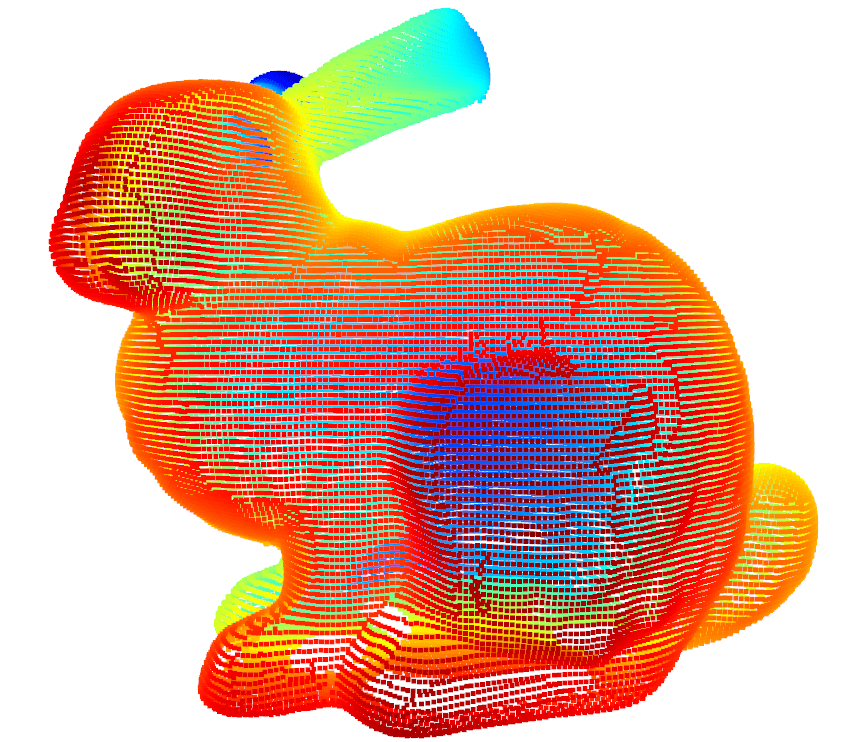
rabbit.pcd(一只非常有名的兔子,文件不要太好找)到testVisualizer.exe的位置,执行.\TestVisualizer.exe pointcloud rabbit.pcd就可以看到一直可爱小兔子的点云图辣。